Making video usually means opening an editor, dragging clips on a timeline and manually exporting every time a piece of data changes. It works for one-off pieces, but it becomes torture the moment you need twenty versions of the same ad with different prices, or a new results summary every month. The alternative we use when video has to be repeatable is to generate it in code with Remotion, and let an AI assistant like Claude Code write that code for us. This article is the no-nonsense guide we'd have liked to find: what it is, how it works and when it's worth it.
What Remotion is and why it changes the rules
Remotion is a tool for creating videos by describing them with code instead of editing them by hand. It sounds abstract, but the idea is simple: the video stops being a closed file you edit on a timeline and becomes a kind of "recipe" that can be run as many times as you want. In the end, that recipe produces a normal MP4, identical to what any editor would give.
That difference has three very practical consequences:
- The video is reproducible. It's saved as text, you can recover any previous version and it rebuilds exactly the same on any computer. No more "where's the real final project?".
- The video is dynamic. If the content comes from a spreadsheet or another system, the same design generates infinite variants without rebuilding it.
- The video is automatable. Creating one is giving a command, so the process can launch itself: in batches, overnight, or when new data arrives.
The trade-off is that Remotion has its own rules, different from those of a website or an ordinary animation. A generic AI assistant doesn't know them and slips up; that's why, as we'll see, the key step is giving it the right context.
Where Claude Code fits
Creating videos this way, by hand, requires knowing how to code. This is where Claude Code comes in, Anthropic's AI assistant that works directly on your project: it understands the work as a whole, writes and modifies the files, and —this is the important part— fixes its own mistakes until something works.
The mindset shift is this: you stop assembling each animation and move to directing. You tell it "create a 5-second intro with the logo entering from below with a soft bounce and the slogan appearing half a second later", and the assistant builds it. You review the result and ask for adjustments: "the bounce is too abrupt, soften it". It's a conversation, in natural language, about a result you can always undo and redo without fear.
Install the official Remotion skill before you start
There's a preliminary step that makes a huge difference to the quality of the result: installing the official Remotion skill. A skill is simply a knowledge package the assistant loads when it detects you're working with that tool. It teaches it the rules and best practices, so it doesn't improvise.
The Remotion team publishes theirs on skills.sh. It's installed with a single command:
npx skills add https://github.com/remotion-dev/skills --skill remotion-best-practices
It also offers it to you automatically when you create a new project. What's interesting is how it works: it doesn't overload the assistant with a giant manual, but feeds it only the part it needs at each moment (animation, audio, subtitles…). The result is that Claude Code writes like someone from the Remotion team itself, instead of guessing.
The layer that separates a good video from a dull one
Knowing the rules guarantees a correct video, but not necessarily a beautiful one. Without guidance, an assistant tends to produce flat, robotic animations: text appearing with a boring fade, movement without rhythm. To raise the bar there are design skills that codify the craft of professional animation into concrete rules. You don't need to understand them in depth, but these are the ideas that turn a dull video into a commercial-looking one:
- Movement with physics, not mechanical. What enters, rotates or grows does so with a touch of inertia and bounce, like in the real world, instead of sliding rigidly.
- Appear with several gestures at once. An element doesn't just fade in: it appears combining opacity, a slight rise and a small growth. It feels more alive.
- Staggered entrances. When several elements enter, they do so one after another with a small offset, creating a cascade that reads better than a simultaneous flood.
- Exits faster than entrances. What leaves, leaves with decision, to make way for what's next with energy.
- A centralised brand. Colours, typefaces and timings live in a single place, so readjusting the style of every video is changing one thing, not a hundred.
These skills are installed just like Remotion's, with a single command. Two worth having on hand:
ui-ux-pro-max, a catalogue of interface design criteria (styles, palettes, typefaces and UX rules) that helps the assistant make aesthetic decisions with grounding. Its listing is on skills.sh:
npx skills add https://github.com/nextlevelbuilder/ui-ux-pro-max-skill --skill ui-ux-pro-max
frontend-design, Anthropic's interface design skill, designed to generate polished interfaces and compositions that avoid the generic look. Also available on skills.sh:
npx skills add https://github.com/anthropics/skills --skill frontend-design
With one of these loaded alongside Remotion's, the assistant doesn't just respect the technical rules: it applies visual judgement that shows in the result.
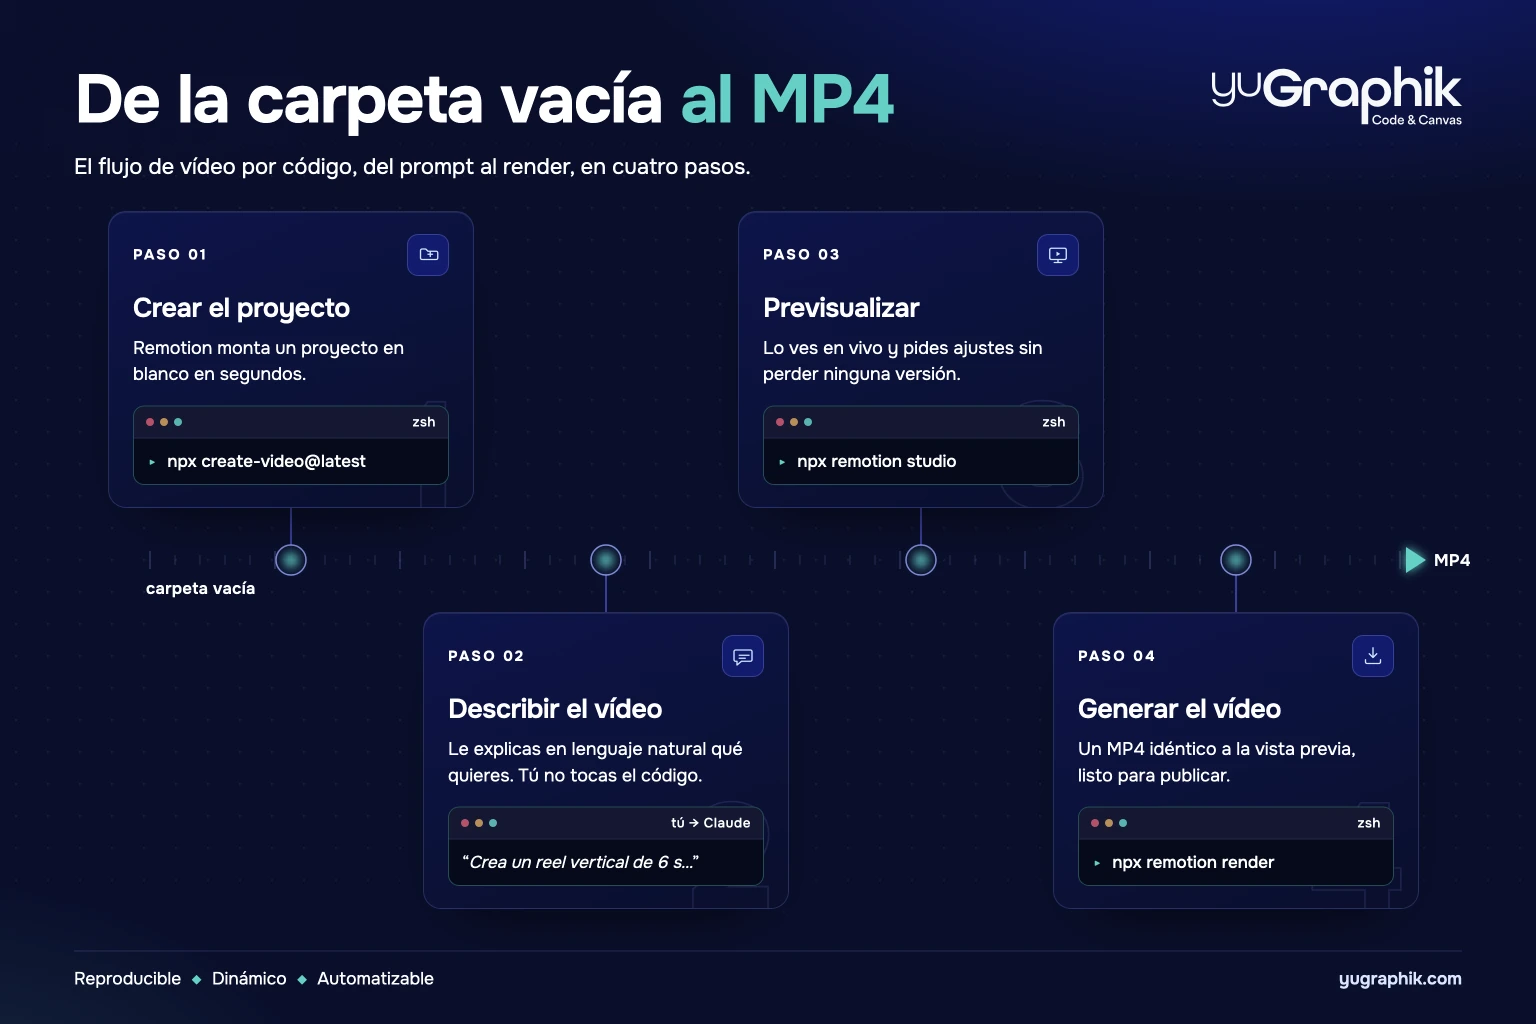
The complete flow in four steps
1. Create the project
Remotion includes a wizard that sets up a blank project in seconds. You can ask Claude Code or launch it yourself with a command:
npx create-video@latest
The result is an empty folder ready to start "shooting".
2. Describe the video
With the project open, you explain to Claude Code what you want. The more specific you are about duration, format and style, the fewer rounds you'll need. A good first brief looks like this:
Create a 6-second vertical video (reel format). Dark blue gradient background. In the centre, the text "Launch 2026" that appears with a fade and a gentle rise during the first second, holds, and disappears in the last half second.
From that sentence, the assistant writes everything needed. You don't touch the code: you give instructions and review.
3. Preview
Before generating the final video, it's worth seeing it live. Remotion includes a studio in the browser with its timeline and play button, opened with a command:
npx remotion studio
There you see the result instantly and ask for adjustments. Since every change is saved, you never lose a version: if a test worsens the video, you roll back without drama.
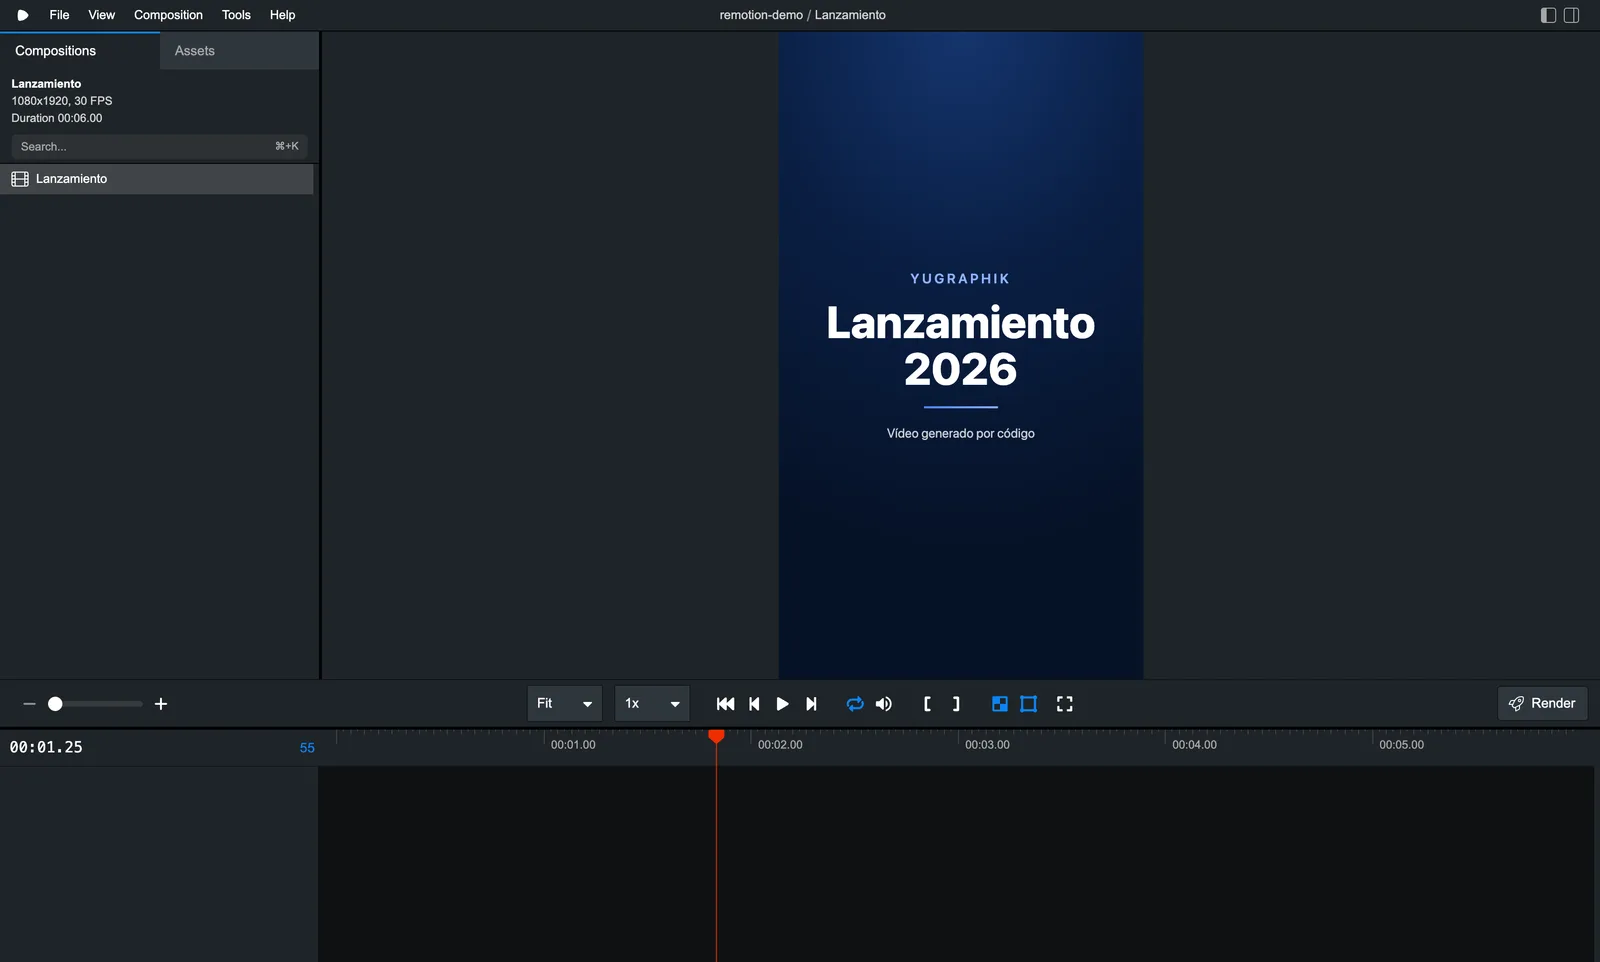
This is how the studio looks with a test video we put together for this article: on the left the list of compositions, in the centre the preview and below the timeline.
4. Generate the final video
When it convinces you, creating the MP4 is giving a command and waiting:
npx remotion render
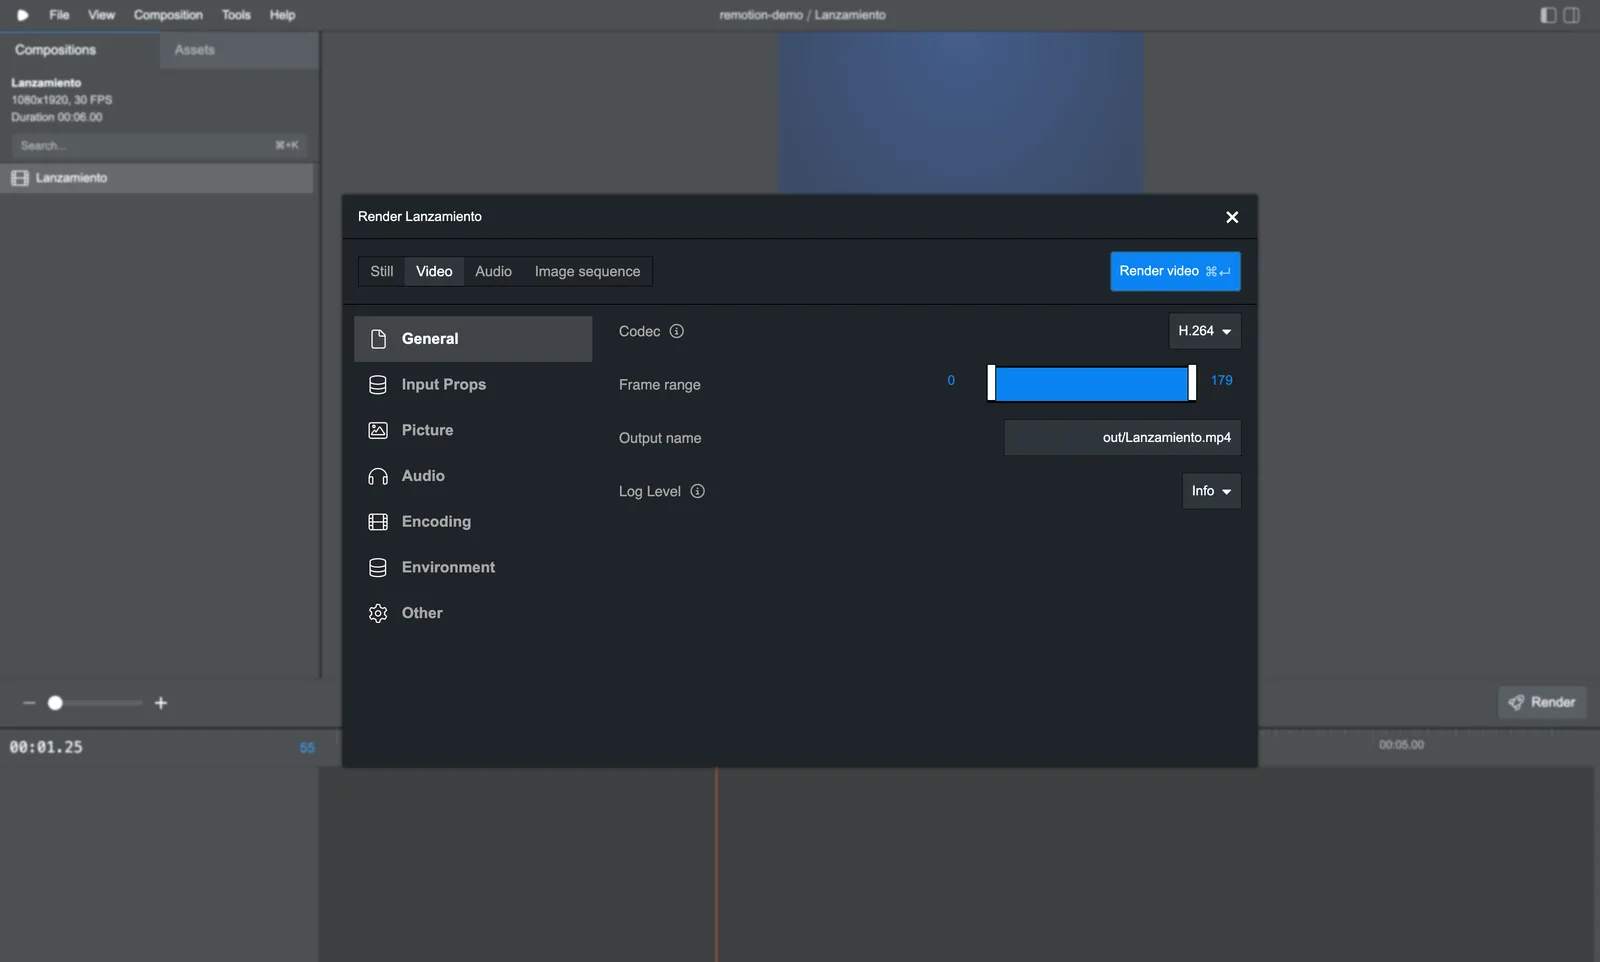
And if you'd rather not touch the terminal, you don't have to: the studio itself has a Render button (top right, as seen in the previous screenshot). Pressing it opens a panel with the export settings —the format (video, audio, single image or image sequence), the codec, which section of the video to export, the file name, the quality or the resolution— and it's generated with one click, without writing anything.
The computer generates the video image by image and joins them into the final file, exactly as it looked in the preview. And that's it: you have a normal video, ready to upload anywhere. This is the real result, generated entirely in code, with the staggered entrances and the quick exit we described above (the on-screen copy is in Spanish, matching our own brand reel):
What format to export for the web: MP4/H.264 or WebM/AV1
Once the render is done, there's a decision that never shows up in any prompt: what format you upload the video in. For this very article we tried both routes with the "Lanzamiento 2026" reel, so the numbers below are real, not lab results.
- MP4 with H.264. It's what Remotion exports by default and the most compatible option: it plays in any browser, phone or editing software without surprises, with hardware decoding even on modest devices. It's the safe choice when the video might end up anywhere outside your control.
- WebM with AV1. It compresses noticeably better than H.264 —30% to 50% smaller at similar quality— at the cost of longer encoding times. Support is already solid in Chrome, Firefox and Edge, but still lags behind in older Safari and iOS versions. Before dropping H.264 as a fallback, it's worth checking real compatibility on caniuse.com/av1.
We ran four passes on this article's reel, and each tweak shaved off real weight:
| Version | Codec / resolution | Size | Change |
|---|---|---|---|
| Original render | H.264, 1080×1920 | 883 KB | — |
| Same size in AV1 | AV1, 1080×1920, CRF 32 | 218 KB | -75% |
| More compression | AV1, 1080×1920, CRF 38 | 148 KB | -83% vs. original |
| Resolution matched | AV1, 720×1280, CRF 38 | 80 KB | -91% vs. original |
The biggest jump didn't come from raising the CRF, it came from lowering the resolution. This page displays the video at a maximum of 520px tall: exporting it at 1920px meant spending bits on detail nobody sees. Matching the export resolution to the size the video will actually play at usually saves more weight than squeezing the codec harder.
The practical rule: if you need maximum compatibility, export MP4/H.264. If you're prioritizing the smallest possible file and you control where the video plays, like in this article, export WebM/AV1.
The detail that changes everything: the assistant reviews its own work
Here's the real difference between asking a chatbot for something and using an assistant that works on your project. A visual flaw —text spilling out of its box, two elements overlapping, a colour that can't be read— doesn't show up as an "error": the file is valid, but the video looks ugly. A blind assistant would hand it to you without a second thought.
Claude Code, with the skill loaded, closes that gap by reviewing itself:
- It assembles the video.
- It generates still images of the key moments.
- It looks at them —yes, it actually observes them— searching for overflowing text, overlaps or poor contrast.
- If something's off, it fixes it, checks again and repeats until it's right.
Only then does it hand it over. It's the difference between "this should look fine" and "I've checked that it looks fine". That cycle of assemble, look, fix is what turns the flow into something reliable instead of a lottery.
Why the movement feels natural
You don't need to master this to direct the assistant, but understanding it helps you ask better. The key to an animation feeling pleasant is the type of movement. Against a mechanical, constant displacement, Remotion knows how to imitate springs: elements that arrive with inertia and settle naturally, like real objects.
That movement can be tuned to achieve different sensations, and you can ask Claude for the character you're after:
| Sensation you ask for | How it moves | What it fits |
|---|---|---|
| Energetic and bouncy | Arrives fast and bounces a little before stopping | Badges, icons, alerts that need to grab attention |
| Clean and precise | Arrives quick and stops dead, without bounce | Corporate text, photos, serious titles |
| Slow and solemn | Starts heavy and advances calmly | Backgrounds, gradients, large opening images |
It's exactly the kind of nuance a professional editor tunes by hand for hours and that here is resolved with a sentence.
The superpower: templated videos, at scale
Everything above is already convenient, but the compelling reason to adopt this approach is the mass production of variants. The idea: you turn your design into a template and tell it which parts change —a headline, a figure, a colour, an image—.
From there, the same video serves for an ad with "Save 20%" in blue and for another with "Free shipping" in green. And with a list of data, Claude Code can generate hundreds of videos in one go. When the data comes from another system —a spreadsheet, a database, a news feed— the video even adjusts its duration on its own based on the content.
The result stops being a dead file: it's a living piece that rebuilds itself infinite times from your data. Here a traditional video editor simply can't compete: making a hundred versions by hand is unfeasible; with a template, it's automatic.
Your brand inside the assistant: a skill with your corporate guidelines
We saw at the start that a skill is a knowledge package the assistant consults. Well: besides the official Remotion skill, you can create your own with your brand identity. It's probably the most valuable idea of this whole approach for a company.
The idea is to put two things into that skill:
- Your brand rules (your corporate guidelines in a version the assistant understands): the exact colours, the typefaces, the tone, how and when to use the logo, the safe margins, what's allowed and what isn't.
- The brand assets the video can access directly: the logo in its different versions, the icons, the typefaces, backgrounds or textures, product photos…
With that installed, you don't have to explain your brand again each time. You ask "make a reel announcing the new service" and the assistant already knows which blue is yours, which typeface to use, which version of the logo to place depending on the background and where to find the icon it needs. The video comes out on-brand by default, not by chance.
The advantages show up right away:
- Automatic consistency. Every video breathes the same identity, without endless reviews to fix a colour or a misplaced logo.
- No loose assets. No more "where was the white logo?" or using an old version: the assistant always pulls the correct asset.
- Scale without losing the thread. A hundred personalised videos that, even being different, clearly look like they're from the same brand.
- Consistency across people. It doesn't matter who requests the video: the result follows the same rules, because the criteria live in the skill, not in one person's head.
- One brand, one place. If the identity evolves —new colour, new logo— the skill is updated once and all future videos inherit the change.
It's the video version of something we already champion on the web: the brand as a reusable system, not as a file each person interprets their own way.
Beyond the basics: voice, data and subtitles
Remotion doesn't live in isolation: it has official packages that connect it with external services, and Claude Code knows how to wire them up for you. You don't need to know what each one does, but it helps to know the map of what you can plug into a brand video:
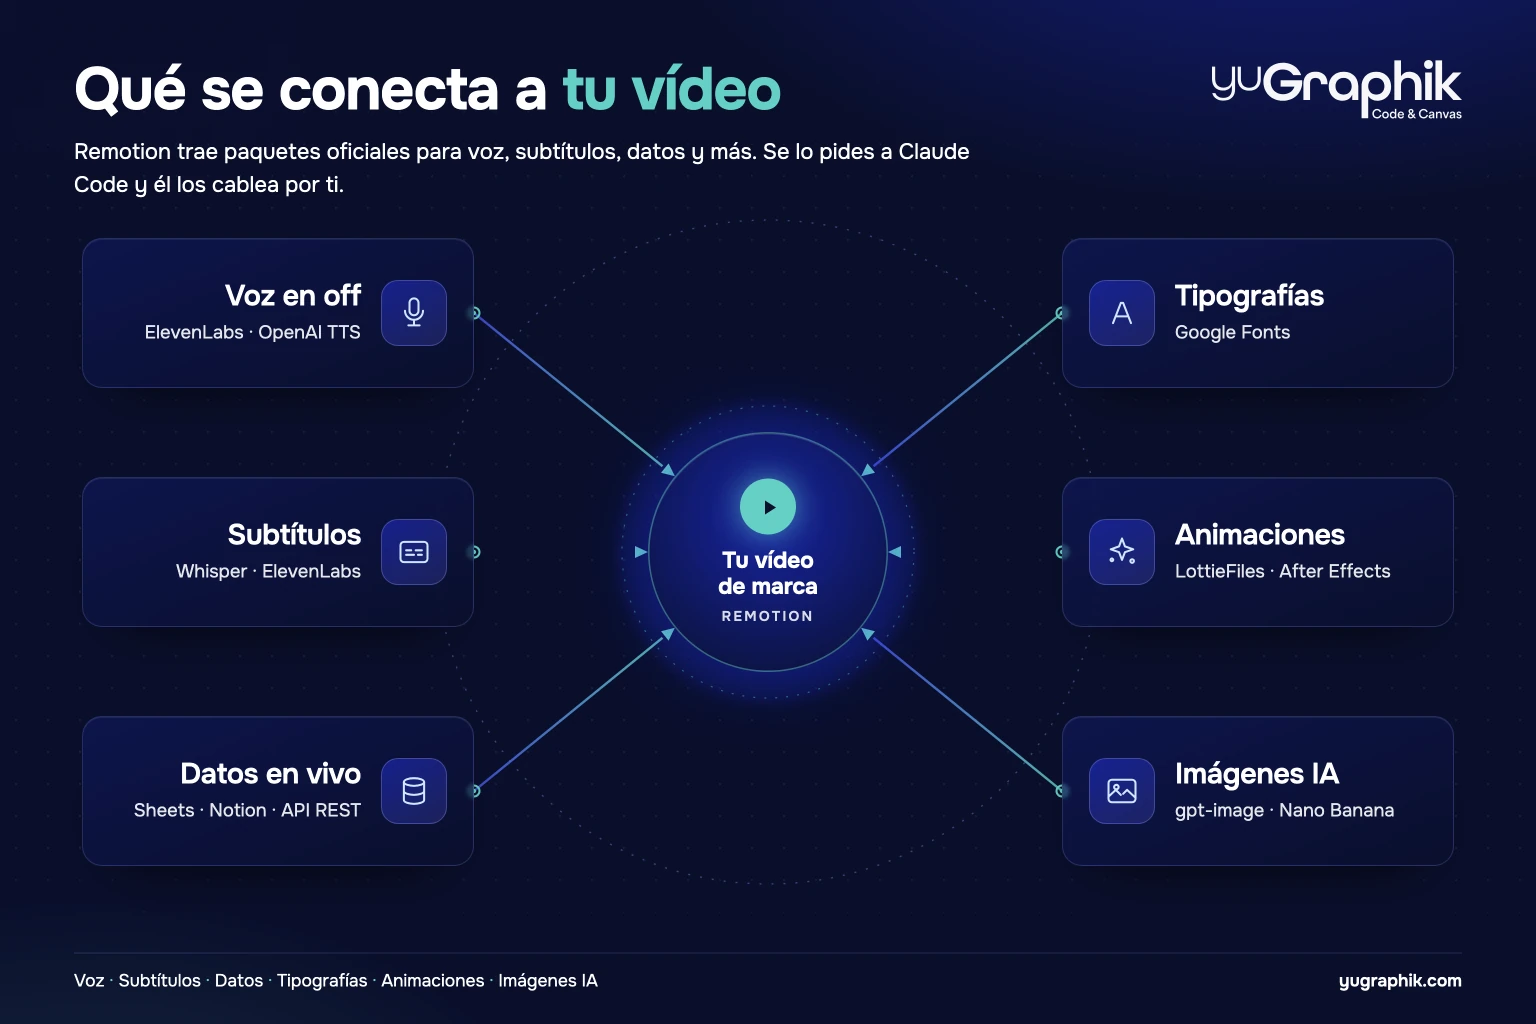
| What for | External service or API | How it connects |
|---|---|---|
| Voice-over (text → audio) | ElevenLabs, OpenAI TTS | They generate the narration from a script with realistic voices; Remotion syncs it with the image |
| Automatic subtitles (audio → text) | OpenAI Whisper, ElevenLabs Speech-to-Text, or Whisper on your own computer | The @remotion/openai-whisper and @remotion/install-whisper-cpp packages transcribe the audio; @remotion/captions gets them ready for the word-by-word "karaoke" effect |
| Live data | Google Sheets, Notion, Airtable, a database or any REST API | The video reads the data at the moment it's generated, so it always comes out with the latest figure |
| Typefaces | Google Fonts | @remotion/google-fonts loads any of its fonts without installing anything |
| Pre-made animations | LottieFiles, After Effects | @remotion/lottie embeds ready-made vector animations, thousands available |
| GIFs and stickers | Giphy, Tenor | @remotion/gif integrates them and measures their duration to fit them on the timeline |
| AI images | Image-generation APIs like gpt-image-2 (OpenAI) or Nano Banana (Google Gemini Flash, in its versions 2 and 3.1) | The generated images enter as just another asset of the video: backgrounds, illustrations or bespoke product variants |
Beyond that table, there are three things worth being clear about in how the assistant works with these pieces:
- Subtitles can be local or in the cloud. If you'd rather not send the audio to any service, Whisper runs on your own computer; if you prioritise convenience, the OpenAI or ElevenLabs API resolves it in seconds. You choose the balance between privacy and speed.
- Charts and data. Animating bars, lines or counters from a table is straightforward, ideal for results summaries; with the data arriving from a spreadsheet or a dashboard, the chart redraws itself.
- Images, audio and video clips. They're integrated, trimmed and combined with the animations; the assistant handles the technical details so that, for example, embedded videos don't flicker.
The beauty is that you don't install or configure any of this: you tell Claude Code "add voice-over with ElevenLabs and automatic subtitles" and it picks the right package, connects it and leaves it working.
Producing a lot: the work in the cloud
Creating videos on your computer is fine for one-off pieces, but generating hundreds at once saturates it. To produce at scale, the heavy lifting is delegated to the cloud, which splits it across many machines working in parallel. What would take minutes locally is resolved in seconds. For any service that generates video on demand or campaigns with thousands of variants, this isn't a luxury: it's what makes the idea viable.
When this approach is worth it (and when not)
It's not the tool for everything. This is the boundary we use to decide:
| Use case | Claude Code + Remotion? |
|---|---|
| Reusable brand intros and outros | Yes, ideal |
| Personalised videos at scale (data, names) | Yes, where it shines most |
| Results summaries or recurring reports | Yes |
| Ads with many variants (languages, prices) | Yes |
| Documentary, interview or unique narrative piece | No: use a traditional video editor |
| Free creative editing over recorded footage | No: code adds no advantage |
The rule is simple: if the video repeats with variations, this approach wins; if it's a unique, unrepeatable piece, it doesn't.
Why we like this flow in an agency
At yuGraphik we work with the same philosophy on the web: we generate sites in code instead of relying on visual builders, because the result is faster, more reliable and cheaper to maintain (we tell it in Next.js vs WordPress). Video as code is the natural extension of that idea: the brand lives in reusable pieces and producing version number one hundred costs the same as the first.
Adding an assistant like Claude Code tears down the barrier this approach had —you needed to know how to code—: now you describe what you want, the assistant builds it, checks that it looks good and you direct. Technical knowledge still matters for the finishing touches and for setting up the automated processes, but the first video is within reach of anyone who can explain what they imagine.
Conclusion
Generating video with Claude Code and Remotion doesn't replace the video editor for the unique creative piece, but it elegantly solves what that editor can't tackle: repeatable video at scale. The flow is short —create, describe, preview, generate—, the assistant reviews its own work, and the result is a piece you can recover, automate and multiply by your data.
If video in your business has become a repetitive task —the same formats over and over with different data— it's exactly the scenario where this approach saves the most time. In our web development service we apply these same automation ideas; if you want to explore how it would fit your brand, let's talk.
Frequently asked questions
Do I need to know how to code to generate video with Claude Code and Remotion?
Not to get started. Claude Code writes the code for you from natural-language instructions, and you review the result in a preview, like reviewing a draft. Knowing how to code helps with the fine finishing touches, but a first video is achieved by describing what you want and letting the assistant build it.
What exactly is Remotion?
Remotion is a tool that lets you create videos by describing them with code instead of editing them by hand in an editor. In the end it exports a normal MP4, like any other video. Its big advantage is that the same design can be reused with different data, which makes it ideal for videos that repeat: reports, ads or personalised pieces at scale.
What's the point of using Claude Code in this flow?
Claude Code is an AI assistant that works on your computer: you describe the video in natural language —'make a 5-second intro with the logo entering from below'— and it writes the project, generates test images, checks how it looks and fixes its own mistakes before handing you the result.
Can I generate many videos automatically with different data?
Yes, and it's where this approach shines most. You define which parts of the video change (a text, a figure, an image, a colour) and generate the same design with hundreds of combinations from a list of data, a spreadsheet or a connection to another system: personalised videos for campaigns, results summaries or greetings.
How do I install the Remotion skill in Claude Code?
The Remotion team publishes an official skill (a knowledge package that teaches the assistant the tool's rules). It's installed with one command: 'npx skills add https://github.com/remotion-dev/skills --skill remotion-best-practices'. From then on, Claude Code automatically applies Remotion's best practices when generating video.
How much does it cost and what do I need to create the videos?
Remotion is free for individuals and teams of up to three people; larger companies need a commercial licence. To create one-off videos a normal computer is enough; when you need to produce many at once, the work is accelerated in the cloud, splitting it across several machines. The real cost is usually the processing time, not the tool.